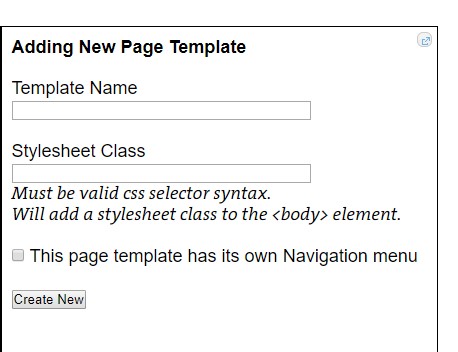
If a congregation has separate branding (logos, colors, etc.) for its religious school, camp, early childhood center, or other programs, Shulcloud provides the ability to create Page Templates for web pages with distinct branding, all within the congregation’s website.
This feature enables:
| Creation of multiple navigation menus on the site |
| Setup of separate calendars so shul events can be viewed independently from camp or school events |
| Selection of which branded pages a specific form or event is associated with |
| Use of CSS to display different logos on shul pages versus other pages |
| Use of CSS to style camp or school pages separately from shul pages |
Important Note: Styling a site with separate branding requires knowledge of CSS coding language. If no one within the congregation or a professional has this expertise, Shulcloud support can provide a quote for the cost of styling the pages.
Create a page template for the secondary brand
The website includes a default page template for the shul. Additional templates can be created for other branding. To begin, navigate to Admin > My Lists > Page Templates.
| Item | Description |
| Template Name | This name is visible only to admins. It is recommended to keep the name simple, such as “Religious School” or “Camp.” |
| Stylesheet Class | This field is required. It adds a class to the body element on the site, allowing CSS styling code to target pages using this template. A stylesheet class must be entered even if no CSS code will be added. |
| This Page Template has its own Navigation Menu | Select this option to enable separate navigation menus for the main site and other branded pages. |
Create pages using the new template
After creating page templates for additional brands, it is possible to select between the default template (used for the main site) and the new templates when creating or editing web pages.
- Navigate to Admin > Website/Media > Pages
- Create a new page or edit the Page Options of an existing page.
Create Multiple Navigation Menus
The images below illustrate a website using two separate page templates. The main congregation site navigation includes links such as About Us, Our Community, and Education. When the Becker School link is selected, a different navigation menu appears with links like Becker Home, Curriculum & Class Overview, and School Staff.
This creates the experience of visiting a distinct, branded site while remaining fully within the Shulcloud platform. Visitors never leave the congregation’s website, yet each program maintains its own identity and navigation.
Main Site
School "Site"
To create separate navigations:
- Ensure the page template is set to have its own navigation menu
- Navigate to Website/Media > Navigation and select the appropriate page template from the dropdown
- Set up the navigation links as usual. Learn how here.
Set up Separate Calendars for Different "sites"
- Navigate to Admin > My Lists > Calendars.
- Select either Add New or an existing calendar to edit.
- Select the page template desired. This will apply the branding associated with the template to the chosen calendar.
- To share the specific calendars on the secondary site, navigate to the main calendar page
- Select the calendars to appear
- Select Update View.
- Copy the new URL of the filtered calendar and use wherever needed.
Apply a Page Template to a Specific Form or Event
The template can also be applied to a form or event.
Forms
Navigate to Admin > Forms > Edit Form.
Events
Navigate to Admin > Calendar > Events > Edit.